This detailed page presents a complete index of all official road signs used throughout Sweden, categorized for easy browsing and revision. Each sign is essential for safe driving and passing your theory exam. Use this resource to familiarize yourself with every symbol, its meaning, and its implications for traffic flow and driver behaviour on Swedish roads, from urban areas to motorways.
Browse the full Swedish road-sign list to efficiently look up individual traffic signs and their specific meanings. Use this comprehensive resource for your theory test sign revision, ensuring you can identify and understand every symbol correctly before your exam.

Prepare for a series of dangerous curves ahead with the A2 warning sign.

Prepare for a Steep Ascent Ahead with the A4 Warning Sign

Prepare for narrowing roads ahead with the A5 warning sign

Warning: The road ahead ends at water!

Prepare for speed bumps and dips with the A9 warning sign.

Understand the A10 Warning for Slippery Road Sign in Sweden

Watch out for falling rocks with the A12 Warning Sign!

Watch out for pedestrians with the A14 Warning Sign!

A15 Warning for Children: Be Extra Cautious for Unpredictable Movements

Watch out for skiers crossing the road with the A17 warning sign.

Watch out for horse riders with the A18 warning sign!

The A20 Roadworks Ahead warning sign means expect changed conditions and workers.

Get Ready to Stop: The A22 Warning Sign for Traffic Lights Ahead

Watch out for low-flying aircraft with this A23 warning sign.

Heed the Warning for Crosswinds Sign (A24) and Control Your Vehicle

Prepare for Tunnels Ahead with the A26 Warning Sign

Prepare for upcoming road intersections with the A28 warning sign.

Prepare for a Roundabout Ahead with the A30 Warning Sign

Watch out for slow-moving vehicles with the A31 warning sign!

Beware of Horse-Drawn Vehicles with the A32 Warning Sign

Be alert for snowmobiles crossing the road with the A33 warning sign.

Prepare to stop for a railway crossing with barriers ahead

Prepare for trams with the A37 Warning for Tramway Crossing sign.

A38 Distance to Level Crossing: Understand the Countdown Markers

Prepare for the A39 Crossbuck sign warning you about an upcoming level crossing.

Prepare for Unexpected Hazards with the A40 'Warning for Other Danger' Sign

Prepare for hazardous bends with the A1 Warning for Dangerous Curve road sign.

Watch out for steep downhill slopes ahead with the A3 warning sign!

Prepare to stop for an opening bridge ahead with the A6 warning sign.

Prepare for an uneven road surface ahead with the A8 warning sign.

Watch Out for Flying Stones Ahead!

Prepare to stop: The A13 sign warns of a pedestrian crossing ahead.

Beware of Cyclists and Moped Riders Ahead with the A16 Warning Sign

Watch out for animals on the road with the A19 Warning sign!

The A21 sign marks the end of the roadworks section.

Prepare for Oncoming Traffic with the A25 Warning Sign

Watch out for weak or high road edges with the A27 warning sign!

A29: Prepare for an intersection where side road traffic must yield or stop.

Prepare for sudden stops with the A34 Queue Warning traffic sign.

Prepare for Railway Crossings Without Barriers: The A36 Warning Sign

Prepare to yield to pedestrians at the marked B3 Pedestrian Crossing.

You are entering a Priority Road with the B4 sign!

B6 Yield to Oncoming Traffic: Know When to Wait

B1 Yield Sign: You Must Give Way to Crossing Traffic

B2 Stop and Give Way: You Must Stop Completely and Yield

Understand the 'Priority Road Ends' Sign (B5) and What to Do Next

The B7 Sign Means Oncoming Traffic Must Yield to You at Narrow Sections

Understand the C3 sign: No Motor Vehicles Allowed, but Moped Class II is Permitted

C4 Sign: No Motor Vehicles With More Than Two Wheels Allowed

Understand the C6 sign: No Motor Vehicles With a Trailer Allowed Here

The C7 'No Heavy Trucks' sign means you cannot proceed with heavy trucks.

C9 Sign: Vehicles Carrying Dangerous Goods Are Prohibited

What the C10 'No Bicycles and Moped Class II' sign means and how to react

What the 'No Moped Class II' (C11) road sign means and how to react

Understand the C13 sign: No Off-Road Motor Vehicles and Trailers Allowed

What Does the C14 'No Horse Riding' Sign Mean?

Understand the C16 'Maximum Vehicle Width' traffic sign and what it means for your journey.

Beware of low clearance: understand the C17 Maximum Vehicle Height sign.

Understand the C19 Minimum Following Distance sign to maintain safe spacing.

Understand the C20 Maximum Gross Weight restriction for vehicles.

The C22 Bearing Capacity Class sign tells you the maximum load the road or bridge can safely handle.

C23 Maximum Axle Load: Ensure your vehicle's axle weight is below the limit.

Understand the C25 'No Turning at Intersection' Traffic Sign

Understand the 'No U-Turn' (C26) Road Sign in Sweden

The 'End of No Overtaking' sign means the restriction is lifted.

Heavy Trucks: No Overtaking Allowed Sign (C29)

What the C31 Speed Limit sign means and how to obey it

The temporary speed limit has ended, but stay alert!

When You See the C34 Sign, You Must Stop for a Specified Reason

Understand the C35 'No Parking' Road Sign in Sweden

The C37 Sign: No Parking on Even-Numbered Days Road Sign Explained

Master the Date Parking sign (C38) for stress-free parking!

Understand the C40 Restricted Purpose Bay Road Sign

The C41 Sign: Your Signal That a Special Parking Area Has Ended

C42 Turning Place (No Parking) Sign: Use the space to turn, but never to park.

The C43 sign marks the end of a designated turning place.

Understand the C44 sign: No Studded Tires Allowed, except for Moped Class II.

The C1 'No Entry' sign means you cannot proceed this way with any vehicle.

Understand the C2 sign: Road Closed to All Vehicles

The C5 sign prohibits motorcycles and moped class I from entering a specific road section.

What the C8 'No Tractors and Motor Implements Class II' Sign Means for Your Drive

Understand the C12 'No Animal-Drawn Vehicles' Prohibition Sign

C15 'No Pedestrians' Sign: Understanding Road Safety Restrictions

Understand the C18 Maximum Vehicle Length restriction sign.

Understand the C21 Maximum Gross Weight Limit Sign

What is the Maximum Bogie Load sign (C24) and how does it affect heavy vehicles?

Learn the meaning of the C27 'No Overtaking' road sign and how to react safely.

The C30 sign signals the end of the restriction on heavy truck overtaking.

You must stop for customs clearance at the C33 sign.

Learn About the C36 'No Parking on Odd-Numbered Days' Traffic Sign

Understand the C39 'No Stopping or Parking' Traffic Sign

D1 Mandatory Direction: Follow the Arrow's Path!

Mandatory Passing Side: Follow the Arrow's Direction!

Prepare for the D3 Roundabout Sign: Know How to Navigate Safely

D5 Mandatory Footpath: This path is exclusively for pedestrians.

D7 Sign: Know Your Lane on Separated Foot and Cycle Paths

The D8 Mandatory Bridleway sign indicates a path for horses and pedestrians.

Know the D10 Sign: Mandatory Lane for Public Transport and Authorised Vehicles

The D11 'End of Mandatory Path' Sign: Knowing When Special Routes Finish

D4 Mandatory Cycle Path: This is for Cyclists Only!

The D6 sign means a shared path for pedestrians and cyclists.

D9: This is a Mandatory Trail for Off-road Vehicles and Pedestrians

Understand the J2 Information Sign: Your Key to Road Accessibility and Safety Guidance
Beware of Dangerous Overhead Power Lines Ahead

Prepare for Motorway Driving: The E1 Motorway Entrance Sign

You are now entering an Expressway (Motor Traffic Road) with special rules.

The E4 sign signals the end of expressway rules, so be ready for a change in road conditions.

The E6 sign means you are leaving a built-up area, so urban conditions no longer apply.

The E7 Pedestrian Street sign means you must yield to pedestrians and restrict your driving.

The E9 Walking Speed Area sign means you must drive at walking pace.

The E11 sign recommends a lower speed for your safety and comfort.

The E12 Sign: Your Signal That Recommended Lower Speeds No Longer Apply

The E14 sign marks the end of a recommended maximum speed advisory.

Prepare for the Weaving Section sign where lanes merge ahead.

E16 One-way Traffic: Follow the Arrow's Direction

The E18 Passing Place sign means you've found a designated spot to let other vehicles pass.

E20 Zone Sign: Understand the Start of an Area with New Traffic Rules

Prepare to pay: This sign indicates a toll road or charging area.

Prepare for Tunnels with the E26 'Tunnel' Road Sign

Understand the E27 Emergency Stopping Place sign for safe breakdowns.

The E28 Emergency Exit sign guides pedestrians to safety in enclosed spaces.

The E29 Escape Route sign guides you to safety during emergencies.

Prepare for the Motorway to End with the E2 Traffic Sign

The E5 Built-up Area sign indicates you're entering an urban zone.

Understand the E8 'End of Pedestrian Street' Sign

E10 Road Sign: You Are Leaving the Walking Speed Area

Understand the Variable Recommended Maximum Speed Sign (E13)

The E17 Dead End Road sign means your route ahead is blocked.

The E19 Parking Sign: Your Guide to Legal Parking Spots

E21 End of Zone: Your Signal to Return to Normal Traffic Rules

The E22 Bus Stop sign: What it means for your driving and the theory test.

The E23 sign marks the end of a designated taxi stand.

Be aware: Automatic traffic enforcement is active in this area.

Prepare for upcoming turns with the F2 Advance Sign for Prohibited Turn.

Understand the F4 Advance Exit Direction Sign to prepare for upcoming exits.

Follow the F5 Direction Sign to reach your destination confidently.

Understand the F6 Table Direction Sign for Clear Route Guidance at Junctions

F8 Lane Direction Sign: Guiding You Safely Through Complex Junctions

The F10 Place Name Sign: Your Guide to Locality Names in Sweden

The F11 Road Name Sign: Your Guide to Named Roads and Routes

Understand the F12 Watercourse Sign: Informational road sign for named waterways.

F14 Route Number Sign: Guiding You Along Sweden's Numbered Roads

Understand the F16 'Increase in Number of Lanes' Road Sign

Prepare for fewer lanes ahead with the Reduction in Number of Lanes sign (F17).

Understand the Junction with Acceleration Lane (F19) Sign and Merge Safely

Prepare for the F20 Junction with Separate Lane sign

Understand the F22 National Border Signmarking your entry into another EU country

Follow the F23 Detour Route Direction Sign for safe diversions.

Follow the indicated direction when encountering a temporary detour.

The F26 Lane Closed sign means you must stop and cannot proceed in your direction.

Know Your Motorway Exit with the F27 Interchange Number Sign

Understand the F29 Park and Ride sign for seamless public transport connections.

The F30 Local Loop sign guides you on circular routes around an area.

The F32 Dangerous Goods sign provides crucial route guidance for hazardous transport.

The F33 Rescue Point sign marks a vital assembly or access location.

Prepare for upcoming junctions with the F1 Advance Direction Sign

Prepare for upcoming junctions with the F3 Diagrammatic Advance Direction Sign.

The F7 Exit Sign: Guiding you safely onto the off-ramp.

Confused by multiple destinations? The F9 Route Guidance Assembly Sign clarifies your options.

The F13 Distance Sign: Your Guide to Distances Ahead

The F15 Permanent Diversion Route sign guides you on a fixed alternative path.

Understand the F18 Lane Configuration Sign for Permitted Lane Directions

Master lane selection with the F21 Lane Guidance Before Junction sign.

Prepare to merge safely as the F25 'Lane Ends' sign indicates a closure ahead.

The F28 Sign: Your Guide to Multi-storey Car Parks

F31: Follow This Route If It's For Your Vehicle Type or Group

The T1 Sign: Defining the Exact Stretch Where a Rule Applies

Prepare for yielding with the T3 Distance to Yield Requirement sign.

Understand the T4 Clear Width sign to ensure safe passage in narrow areas.

Understand the T6 Time Indication sign to know exactly when a rule applies.

The T8 Symbol Plate: Understanding Which Vehicles the Sign Applies To

Prepare for pedestrians with reduced vision using the T9 warning sign.

Be extra vigilant for pedestrians who cannot hear you approaching with the Reduced Hearing sign (T10).

The T12 Direction sign shows you exactly which way an instruction applies.

All Way Yield: Understand Who Has Priority at This Junction

Understand Junction Priority with the T15 Continuation of Roads Sign

The T17 Parking Disc sign means you must display a parking disc when you park.

Understand Sweden's T18 Permitted Parking Time Sign

The T20 Parking Ticket sign means parking is free, but you must still use a ticket.

The T21 sign shows you exactly how to position your vehicle when parking.

The T2 Distance Sign: How Far to the Next Situation?

Understand the T5 Gross Weight Threshold sign and its implications for heavy vehicles.

T7: Special Rules for Stopping and Parking Sign - Understand Parking Exceptions

Understand the T11 Extent sign to know where traffic rules apply.

The T14 All Way Stop sign means everyone must stop at this junction.

The T16 'Fee' Sign Means Parking Requires Payment and Adherence to Conditions

The T19 Residents Sign: Parking Reserved for Permit Holders Only

T22 Text Sign: Essential Written Instructions for Drivers

Follow the M4 Guide Line to navigate complex junctions safely.

Understand the M6 Lane Line for Public Transport and Certain Vehicles

Decode the M10 sign: understand solid and broken lines for safe lane changes.

The M12 Center Line with Warning Line: When Caution is Key

Understand the M16 Cycle Crossing Sign and Cyclist Priority

Prepare to yield or stop ahead with the M18 Advance Warning marking.

M20 Mandatory Lane Change: Understand What to Do

The M23 Sign Reinforces No Stopping or Parking Restrictions

M27 Pedestrian Symbol: Know Where Pedestrians Walk and Be Ready to React

Understand the M29 Speed Limit Marking on the Road Surface

M32 STOP Road Marking: Your Crucial Reminder to Stop!

Understand the M1 Center Line or Lane Line road sign for safe driving

M2 Edge Line: Your Guide to the Road's Outer Boundary

The M3 Warning Line: A Cautionary Signal on Swedish Roads

Understand the M5 Cycle Lane Line – A Broken Line for Cyclist Safety

Understand the M7 Reversible Lane Boundary Traffic Sign

The M8 Solid Line sign means you must not cross this continuous marking.

The M9 Hatched Area sign means you must not drive on the marked zone.

Understand the M11 Warning Line with Solid Line: What it Means and How to React

Master the M13 Stop Line: Know Exactly Where to Stop for Safety and Exam Success

Know your M14: The Yield Line Tells You Where to Give Way Safely

Understand the M15 Pedestrian Crossing Markings and Pedestrian Priority

The M17 Speed Bump sign warns you to slow down for a traffic calming measure ahead.

Understand M19 Lane Direction Arrows to choose the correct lane at junctions.

Understand the M21 Sign: Strictly No Stopping or Parking Allowed

M22 No Parking Sign: Understand What It Prohibits on Swedish Roads

Understand the M24 Parking Bay Boundary road sign to park correctly.

Understand the M25 Pedestrian and Cycle Arrow sign for shared path directions.

The M26 Bicycle Symbol Sign: Navigating Cycle Paths and Lanes

Decode the M28 Bus Symbol: Reserved Lanes for Public Transport

The M30 Route Number Marking helps you follow your intended route.

M31 Purpose-Specific Parking Place: Understanding Designated Parking Bays

M33 Disabled Parking Place: Reserved Parking for Those Who Need It

What M34 Information Markings on the Road Surface Mean for You

The Green Signal: Proceed with Caution When Safe

SIG5 Flashing Amber Signal: Slow Down and Proceed with Caution

Understand the SIG7 Green Acoustic Signal for Safe Crossing

Prepare to stop: The SIG8 'S' signal requires you to halt.

SIG10 Vertical Bar Signal: Your signal to proceed when clear.

What the SIG11 Horizontal Bar Signal means: You MUST stop.

The Red Cross traffic sign (SIG12) means your lane is closed – act immediately!

The Green Arrow Sign: Your Lane is Open and Ready for Traffic!

What the SIG16 Red Flashing Light Traffic Sign means: You must stop!

Steady Red Light (SIG17) Means the Road is Completely Closed

The Red and Amber Signal: Stop Now, but Green is Coming Soon!

The Amber Signal: Know When to Stop and When to Safely Proceed

Stop and listen: The SIG6 Red Acoustic Signal means do not cross.

Prepare for Go: What the Horizontal Bar Signal Means

Follow the Amber Arrow: You Must Change Lane!

This Red Flashing Light Means You Must Stop Immediately.

When you see a flashing amber light (SIG18), proceed with extreme caution.

Stop Your Vehicle Immediately If an Officer is Facing You or Your Rear

Understand the Police 'Proceed' Signal (P4) and How to React Safely
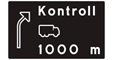
P7 Advance Information: Control Ahead warns you of an upcoming checkpoint.

What to do when a police vehicle signals you to follow and stop.

You must stop when the police officer's palm faces you.

Understand the P3 'Stop' Sign with a Police Lantern

P5: Slow Down When You See the Officer Facing You

P6 Control Sign: You Must Enter the Inspection Area

Understand the P8 'Reduce Speed' signal from a police vehicle

P9: Reduce Speed When Meeting an Oncoming Police Vehicle

P11: Pull Over and Stop for Police Vehicle Instructions

The S1 Heavy Goods Vehicle Sign: What it Means for Trucks and Drivers

S2 Heavy Goods Vehicle with Trailer: Know What This Sign Means for Your Drive

Understand the S6 Sign for Tractors and Class II Motor Implements

S7 Sign: Guidance for Motorcycles and Mopeds Class I

Understand the S8 sign for bicycles and Class II mopeds.

The S9 sign indicates that instructions and restrictions apply to vehicles towing a trailer.

The S11 Sign: Understanding Symbols for People with Disabilities

The S10 Sign: Guiding You on Pedestrian Routes and Areas

What Does the S13 Passenger Ferry Sign Mean for Drivers?

Obstacle Marker Board (X2) Warns of Road Restrictions Ahead

Follow the Yellow Light Arrow: Your clear path guidance.

X8 Level Crossing Board: Enhancing Visibility at Rail Crossings

Understand the Traffic Controller's 'Proceed' Hand Signal (X11)

The X1 Marking Arrow warns you to steer sharply in the direction shown.

The X3 Marker Board warns you to adjust speed and position for side obstacles or road changes.

The X4 Exit Gore Board marks the crucial split for your motorway exit.

The X6 Special Warning Device alerts you to temporary road restrictions.

The X7 Barrier Gate Sign Means the Road Ahead is Closed

The X9 Roundabout Centre Marker guides you safely around the centre of a roundabout.

Understand the Stop Hand Signal (X10) from a Traffic Controller

The X12 Identification Mark sign means a special marking must be visible from both the front and the rear.
Continue your preparation by exploring our extensive library of Swedish driving theory articles. Find in-depth explanations on specific road rules, traffic signs, and driving situations to master all necessary concepts before your exam. Start learning now to secure your licence.
Swedish Driving Theory Guides


