This lesson guides you through the critical, immediate steps required to make an incident scene safe when operating a heavy goods vehicle. Mastering these protocols is essential for the Swiss theory exam and ensures you can protect yourself, your load, and other road users in emergency situations.

Lesson content overview
For drivers of Category C and C1 goods vehicles in Switzerland, understanding the correct procedures for securing a vehicle at an incident scene is paramount. This lesson, part of your Official Swiss Driving Theory Course for Category C & C1 Goods Vehicles, details the critical steps you must take immediately after an unplanned stop, transforming a potential hazard into a controlled environment. The primary goal is to protect yourself, your passengers, other road users, and incoming emergency responders from secondary collisions and further dangers.
An unexpected stop, whether due to a breakdown, accident, or other emergency, instantly transforms your heavy goods vehicle into a significant hazard on the road. Due to their size and mass, commercial vehicles stopping unexpectedly pose a greater risk of severe secondary collisions if not properly secured and marked. Ignoring proper securing procedures can lead to grave consequences, including serious injuries, fatalities, legal penalties, and significant delays for emergency services.
The immediate actions you take are designed to create a buffer zone around your vehicle, providing approaching traffic with ample warning to react safely. This proactive approach is not just a recommendation; it is a legal obligation under Swiss traffic law, ensuring a standardised safety protocol for all road users.
Effective incident scene management for heavy goods vehicles is built upon several fundamental principles that integrate legal requirements with practical safety measures. Adhering to these principles ensures a methodical and safe response to any roadside emergency.
The first step in securing your vehicle is recognising that any stationary vehicle, especially a large one, creates an immediate and dynamic hazard. This risk is amplified by factors such as road type, speed limits, visibility, and traffic volume. A proactive driver continuously assesses these surroundings, understanding that the danger isn't just to them, but to everyone approaching the scene. Early detection and assessment of potential risks are crucial for preventing accidents and ensuring the safety of all involved.
Increasing the visibility of your stopped vehicle and yourself is a critical safety measure. This principle involves using every available tool and technique to make your presence known to other road users from the greatest possible distance. Maximised visibility allows approaching drivers more time to perceive the hazard, process the information, and execute a safe maneuver, such as slowing down or changing lanes. This includes the immediate activation of vehicle warning systems and the personal use of highly visible safety gear.
A warning triangle is a vital piece of safety equipment, designed to provide an advance visual cue to approaching motorists. Its strategic placement is governed by physics, specifically the reaction and braking distances required for vehicles traveling at various speeds. Placing the triangle too close to your vehicle defeats its purpose, as it doesn't allow sufficient time for high-speed traffic to react. Conversely, placing it at the correct, legally mandated distance provides a critical safety buffer, reducing the likelihood of a rear-end collision.
Your safety as the driver is paramount. Exiting a heavy goods vehicle at an incident scene, particularly on high-speed roads, presents inherent dangers from passing traffic. This principle dictates a methodical exit procedure that minimises your exposure to risk. It involves carefully checking your surroundings, preparing yourself with appropriate safety gear, and ensuring the vehicle itself is immobilised before you step out into traffic. Prioritising personal safety prevents further incidents and allows you to effectively manage the situation.
Every step of the vehicle securing procedure is underpinned by Swiss traffic legislation, including the Road Traffic Act and the Swiss Highway Code. Adhering to these regulations is not only a matter of avoiding legal penalties, but also about upholding a standardised safety protocol that protects all road users. Non-compliance can lead to fines, license penalties, and an increased risk of liability in the event of further accidents. Understanding and following these mandatory rules is a professional responsibility for every commercial driver.
Effectively managing an incident scene with a heavy vehicle involves a structured series of actions. These steps are designed to be performed in a specific sequence to maximise safety and warning effectiveness.
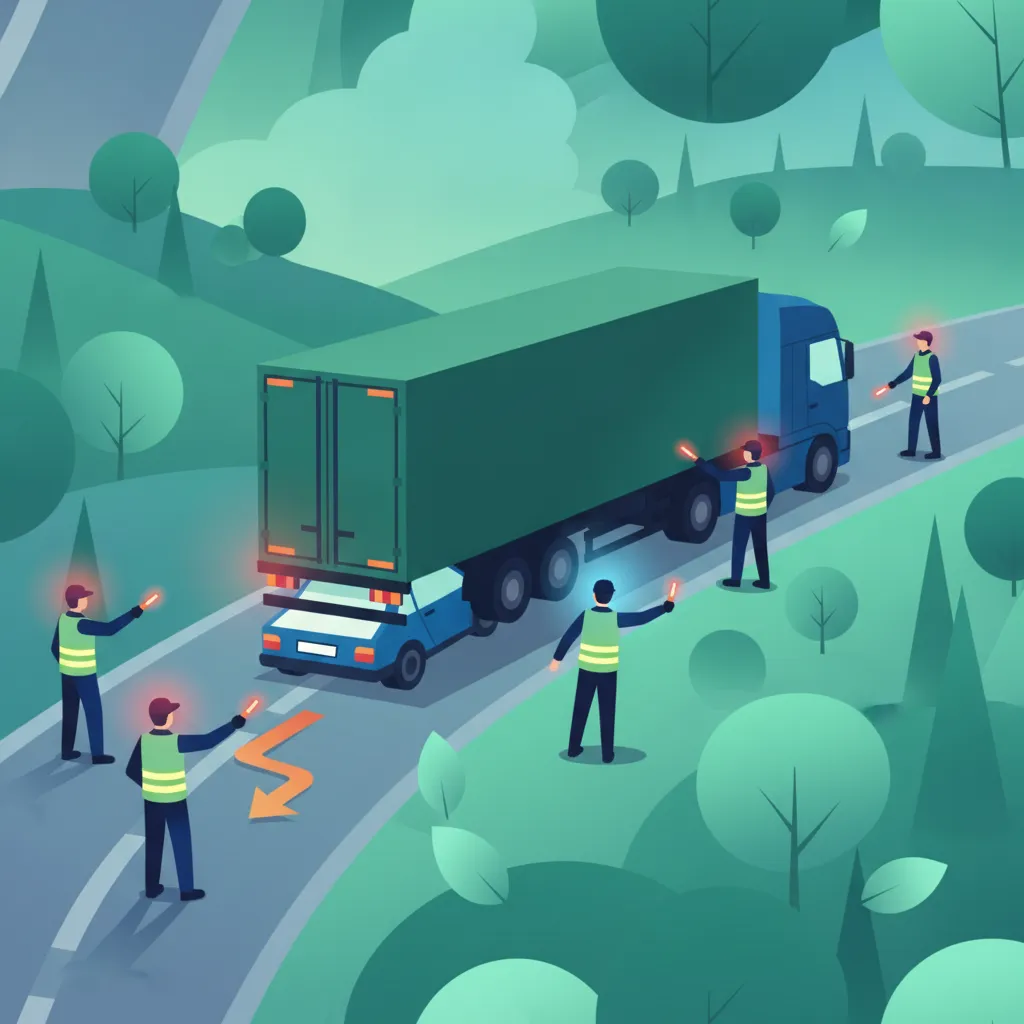
The hazard warning lights (or "hazards") are flashing amber lights on your vehicle that indicate it is stationary and poses a potential hazard to other road users. Immediately after bringing your vehicle to an unexpected stop in a dangerous situation, activating these lights is your first priority. They provide an instant, unmistakable visual signal to traffic behind you that something is amiss, prompting them to slow down and exercise caution. These lights should remain active until your vehicle is safely removed from the problem area or the hazard is otherwise mitigated.
Before you even consider exiting the cab of your heavy goods vehicle at an incident scene, you must put on high-visibility clothing, such as a reflective vest. This clothing is equipped with reflective material that significantly enhances your personal visibility, particularly in low-light conditions, adverse weather, or on high-speed roads. Being seen by approaching traffic is crucial for your personal safety, preventing you from being struck while you are outside the vehicle performing securing tasks or waiting for assistance. For heavy goods vehicle drivers, this is a compulsory safety measure.
The warning triangle is a reflective, freestanding device used to provide advanced warning to approaching traffic. Its correct placement is critical:
The warning triangle should be placed in a position that is clearly visible to approaching traffic, often on the same side of the road as your vehicle, slightly into the lane if safe to do so, to ensure maximum impact.
Exiting your heavy goods vehicle after an unplanned stop requires a systematic approach to protect yourself from oncoming traffic.
Assess Surroundings: Before opening your door, thoroughly check your mirrors and blind spots for approaching traffic. Note the speed and proximity of other vehicles.
Activate Hazard Lights: Ensure your hazard warning lights are already active.
Don High-Visibility Clothing: Put on your reflective vest or jacket while still inside the cab.
Secure Vehicle (Transmission & Brakes): Engage the handbrake firmly and, if possible, select a safe gear (e.g., neutral or park for automatic transmissions, or first/reverse for manual transmissions, especially on slopes) to prevent any unintended movement of the vehicle. If on a slope, consider turning the wheels towards the curb (if safe and present) or using wheel chocks if available.
Exit Carefully: Open your door cautiously, being mindful of passing traffic and the vehicle’s blind spots. Step out facing oncoming traffic where possible, remaining alert to your surroundings.
While waiting for assistance or attending to minor issues, you might need to manage traffic flow to a basic extent. Beyond your hazard lights and warning triangle, you should never unnecessarily obstruct traffic. If it's safe and permissible, always attempt to move your vehicle entirely off the main carriageway onto the road shoulder or a designated emergency stopping area. If you must remain partially in a lane, use additional warning devices like road cones (if available) to delineate a safe path around your vehicle. Your role is to minimise disruption and prevent further accidents, not to direct traffic actively unless absolutely necessary and trained to do so.
Adherence to specific rules and regulations is not optional but mandatory for heavy goods vehicle drivers operating on Swiss roads. These rules are designed to ensure consistent safety standards across the country.
Under Swiss traffic law, the activation of hazard warning lights is compulsory immediately after an unexpected stop due to an emergency or mechanical failure. This applies to all road types but is particularly critical on motorways, expressways, and other high-speed routes where traffic approaches rapidly. Failing to activate these lights promptly can lead to legal penalties and significantly increases the risk of a rear-end collision.
Swiss regulations mandate that drivers of heavy goods vehicles must wear high-visibility clothing before exiting their vehicle at an incident scene, especially where visibility is limited or traffic is fast-moving. This measure ensures the driver's safety by making them easily discernible to other road users, preventing accidents involving pedestrians on the roadway.
The placement of the warning triangle is subject to strict distance requirements in Switzerland:
These distances are designed to provide approaching drivers with adequate time to react, considering vehicle speeds and braking distances. Incorrect placement can render the warning ineffective and may result in legal consequences.
Before exiting your heavy goods vehicle, it is essential to secure its transmission and brakes. This typically involves engaging the handbrake firmly and placing the gear selector in neutral (N) for automatic vehicles or engaging a low gear (first or reverse) for manual transmissions. This step is particularly vital when stopped on an incline or decline, as it prevents the vehicle from unintended movement that could cause further accidents or injuries. While not always explicitly stated as a separate legal 'rule' for exiting, it falls under the general obligation to operate your vehicle safely and prevent hazards.
Whenever it is safe and legally permissible to do so, you should always attempt to move your heavy goods vehicle entirely off the main carriageway. This means steering onto the hard shoulder, into an emergency lay-by, or off the road completely if possible. This action significantly reduces the obstruction to traffic flow and minimises the risk of a rear-end collision. If moving the vehicle is not possible or safe, ensure it is positioned as close to the edge of the carriageway as circumstances allow, without endangering yourself or others.
Even experienced drivers can make critical errors during an incident, often due to stress or insufficient training. Awareness of these common violations is crucial for effective incident management.
Remember: Even with proper procedures, incident scenes remain dangerous. Always prioritise your personal safety and call for professional assistance as soon as possible.
The basic securing procedures must be adapted to various environmental and contextual factors to maintain maximum safety effectiveness.
When emergency vehicles (police, ambulance, fire brigade) arrive at the scene, their presence often creates additional safety measures (e.g., temporary road closures, directional signals). You must give them priority and follow any instructions they provide. Ensure your warning triangle or your own actions do not interfere with their operations. Your initial securing efforts help create the safe workspace they need.
The meticulous execution of vehicle securing procedures has far-reaching positive effects:
Conversely, neglecting these procedures increases accident probability, delays emergency services, and can lead to severe legal and personal consequences. For example, failing to deploy a warning triangle at the correct distance substantially reduces the reaction time for approaching drivers, directly contributing to a higher risk of collision. Similarly, not wearing high-visibility clothing means you may not be seen, increasing your risk of being struck by traffic.
Understanding the theory is vital, but applying it in real-world scenarios is what truly prepares a professional driver. Here are a few common situations:
Setting: You are driving a Category C1 goods vehicle on a Swiss motorway at 80 km/h when you experience a sudden tyre puncture in the outer lane. Procedure:
Correct Behavior: All steps performed, providing maximum warning to high-speed motorway traffic and ensuring driver safety. Incorrect Behavior: Exiting without a vest, or placing the triangle only 30 metres behind, which is insufficient for motorway speeds.
Setting: Your delivery truck experiences an engine failure on a busy urban street with a 50 km/h speed limit. There's no immediate lay-by. Procedure:
Correct Behavior: Quick action to warn urban traffic and ensure personal visibility, minimising disruption. Incorrect Behavior: Leaving the cab without a vest, assuming urban traffic is slow enough not to need a triangle, or placing it too close.
Setting: While ascending a steep, winding mountain road in a heavy truck, you notice your load has shifted, causing instability. Procedure:
Correct Behavior: Prioritising vehicle immobilisation on a slope and adapting triangle placement for winding road visibility. Incorrect Behavior: Neglecting the handbrake, not wearing a vest in potentially low-visibility mountain conditions, or underestimating the danger of a shifted load.
Setting: Your heavy goods vehicle suffers a mechanical breakdown within a long Swiss tunnel. Procedure:
Correct Behavior: Rapid use of hazard lights and high-visibility gear, followed by prompt communication with tunnel authorities, crucial in confined tunnel environments. Incorrect Behavior: Relying solely on hazard lights, not using a vest, or failing to contact tunnel management immediately.
For professional drivers of Category C and C1 goods vehicles in Switzerland, mastering incident scene procedures is a cornerstone of road safety. The methodical approach ensures that an unexpected stop does not escalate into a secondary incident.
Upon any unplanned stop, you must:
Adherence to these precise steps not only complies with Swiss traffic regulations but profoundly enhances safety for yourself, other road users, and emergency personnel, contributing to a more secure road network for all.
This lesson covers the critical procedures for securing a heavy goods vehicle at an incident scene as required for the Swiss Category C and C1 theory exam. The core sequence involves activating hazard warning lights immediately, securing the vehicle with handbrake and neutral gear, donning high-visibility clothing before exiting, and placing a warning triangle at the correct distance (100m on motorways, 30m on other roads). Specific Swiss legal obligations are detailed, including mandatory hazard light use, compulsory reflective vests, and exact triangle placement distances by road type. The lesson also addresses adapting procedures for weather conditions, tunnels, mountain roads, and vehicle load considerations, with practical scenarios demonstrating correct versus incorrect behaviour.
A short set of high-value points that capture the most important learning from this lesson.
Activate hazard warning lights immediately upon any unexpected stop to alert following traffic without delay.
Don high-visibility clothing (reflective vest) inside the cab before opening the door to protect yourself from passing traffic.
Place the warning triangle at the legally mandated distance: 100 metres on motorways, 30 metres on other roads, and 50 metres on expressways.
Secure the vehicle with the handbrake engaged and neutral gear selected before exiting, especially on inclines.
Always assess mirrors and blind spots thoroughly before opening the cab door to avoid stepping into traffic.
Explore all units and lessons included in this driving theory course.
The mandatory safety sequence is: hazard lights first, then secure transmission and brakes, then don high-visibility clothing, then check traffic before exiting.
On motorways, the 100-metre triangle distance is non-negotiable; 30 metres is only for non-motorway roads.
On mountain roads or slopes, turn the front wheels toward the curb and use wheel chocks if available to prevent roll-back.
In tunnels, place the triangle at least 30 metres behind and use the emergency telephone to report your exact location to tunnel authorities.
Even on short stops or in low-traffic areas, never exit without high-visibility clothing; the risk remains significant.
Failing to activate hazard lights before unbuckling the seatbelt, depriving following traffic of immediate warning.
Placing the warning triangle only 30 metres behind on a motorway, which is dangerously insufficient for high-speed traffic to react.
Exiting the vehicle without wearing high-visibility clothing, especially in low-light, adverse weather, or high-speed conditions.
Neglecting to engage the handbrake or select neutral gear on a slope, risking unintended vehicle movement.
Opening the cab door without checking mirrors and blind spots first, exposing the driver to being struck by passing traffic.
Lesson content overview
A short set of high-value points that capture the most important learning from this lesson.
Activate hazard warning lights immediately upon any unexpected stop to alert following traffic without delay.
Don high-visibility clothing (reflective vest) inside the cab before opening the door to protect yourself from passing traffic.
Place the warning triangle at the legally mandated distance: 100 metres on motorways, 30 metres on other roads, and 50 metres on expressways.
Secure the vehicle with the handbrake engaged and neutral gear selected before exiting, especially on inclines.
Always assess mirrors and blind spots thoroughly before opening the cab door to avoid stepping into traffic.
Explore all units and lessons included in this driving theory course.
The mandatory safety sequence is: hazard lights first, then secure transmission and brakes, then don high-visibility clothing, then check traffic before exiting.
On motorways, the 100-metre triangle distance is non-negotiable; 30 metres is only for non-motorway roads.
On mountain roads or slopes, turn the front wheels toward the curb and use wheel chocks if available to prevent roll-back.
In tunnels, place the triangle at least 30 metres behind and use the emergency telephone to report your exact location to tunnel authorities.
Even on short stops or in low-traffic areas, never exit without high-visibility clothing; the risk remains significant.
Failing to activate hazard lights before unbuckling the seatbelt, depriving following traffic of immediate warning.
Placing the warning triangle only 30 metres behind on a motorway, which is dangerously insufficient for high-speed traffic to react.
Exiting the vehicle without wearing high-visibility clothing, especially in low-light, adverse weather, or high-speed conditions.
Neglecting to engage the handbrake or select neutral gear on a slope, risking unintended vehicle movement.
Opening the cab door without checking mirrors and blind spots first, exposing the driver to being struck by passing traffic.
Explore search topics learners often look for when studying Procedures for Securing the Vehicle at an Incident Scene. These topics reflect common questions about road rules, driving situations, safety guidance, and lesson level theory preparation for learners in Switzerland.
Browse additional driving theory lessons that cover connected traffic rules, road signs, and common driving situations related to this topic. Improve your understanding of how different rules interact across everyday traffic scenarios.
Learn essential procedures for managing traffic flow around your heavy vehicle after an incident or breakdown on Swiss roads. Understand how to create safe zones and signal to other road users according to official driving theory.

Losing part of a load on the road creates an immediate and serious hazard for other drivers. This lesson outlines the driver's responsibilities: stop in a safe place, assess the situation from a safe distance, and immediately alert the police. The driver's primary role is to warn other road users and not to attempt to retrieve the load from a live carriageway.
This lesson provides a structured guide for managing the scene of a road traffic accident. It covers the internationally recognized priorities: assess for danger, make the scene safe, send for help by calling emergency services (112), and provide first aid to the injured if trained to do so. It also details the legal requirement to stop and exchange information after being involved in a collision.

A tyre blowout or engine failure can be a frightening experience. This lesson provides a clear action plan: maintain a firm grip on the steering wheel, avoid harsh braking, signal, and move the vehicle to a safe location like the hard shoulder if possible. It then covers the essential safety steps of activating hazard lights, placing the warning triangle, and waiting in a safe place away from the vehicle.

A breakdown can be a dangerous situation, especially on a busy road or motorway. This lesson provides a clear, sequential guide to follow. It includes pulling over to a safe location, activating hazard lights, placing the warning triangle, ensuring passenger safety, and contacting the appropriate services for assistance.

This lesson covers the immediate actions to take following a collision. The priorities are to prevent further incidents by securing the scene, to assess the situation for injuries, and to alert the emergency services. You will learn the correct procedures for making the area safe for yourself, your passengers, and other road users.

Pedestrians, cyclists, motorcyclists, and e-scooter riders are extremely vulnerable in any interaction with a heavy vehicle. This lesson instills a defensive mindset, teaching drivers to be hyper-aware of VRUs, especially near junctions, crossings, and cycle lanes. It focuses on anticipation and giving VRUs extra space, as they can be unpredictable and are often hidden in blind spots.

Urban driving requires heightened awareness and careful planning. This lesson covers the challenges of narrow streets, heavy traffic, and the need to identify designated loading and unloading zones. It emphasizes the importance of planning routes in advance to account for time-based access restrictions and to avoid unsuitable roads.

This lesson provides a practical guide for handling a vehicle breakdown. It covers the immediate steps to take, such as moving the vehicle off the road if possible and making it visible to other traffic using hazard lights. The content also explains how to contact breakdown services and what information to provide to them.

Unlike cars, heavy vehicles cannot travel on every road. This lesson stresses the importance of using HGV-specific satellite navigation systems or carefully checking maps to plan routes that avoid low bridges, weak bridges, and roads with weight or width restrictions. Proper planning saves time, fuel, and prevents dangerous situations or costly damage.

Rural roads present challenges like narrow lanes, poor surfaces, sharp bends, and limited visibility. This lesson teaches drivers how to position their large vehicle to maximize space and visibility, anticipate oncoming traffic at blind corners, and be aware of specific rural hazards. These hazards include slow-moving agricultural vehicles, animals on the road, and concealed farm entrances.
Discover how to adapt vehicle securing and incident response procedures for heavy goods vehicles in challenging Swiss weather conditions, including fog, snow, and rain. Ensure safety in low visibility driving theory.

Weather has a profound impact on vehicle handling and visibility. This lesson teaches you how to reduce speed, increase following distances, and use controls smoothly to maintain traction in poor conditions. It also covers the legal requirements and practical application of snow chains in winter.

This lesson examines the impact of various weather conditions on driving safety. It explains how to adjust speed in low visibility and the risks of aquaplaning in heavy rain. The content also covers using snow chains in snowy conditions, handling icy surfaces, and dealing with strong winds, particularly on bridges and open roads.

Wet or icy roads drastically reduce tyre grip and can double or triple braking distances. This lesson stresses the importance of significantly reducing overall speed and increasing following distances in such conditions. It advises on using brakes with extreme care to avoid skidding and explains how the vehicle's retarder should be used with caution as it can cause the drive wheels to lock up on slippery surfaces.

This lesson examines the impact of weather and visibility on driving safety and speed selection. It covers how fog, rain, snow, and darkness affect visibility and reaction times, providing guidelines on adjusting speed. It also includes strategies for improving visibility, such as proper headlamp use, to ensure you can adapt to varying weather conditions.

This lesson details how adverse weather conditions like rain, fog, and snow affect motorcycle safety. It explains how wet surfaces reduce tyre grip, requiring smoother control inputs and longer braking distances. Strategies for managing reduced visibility in fog and the extreme hazards of riding on snow and ice are also covered.

High-sided lorries and trailers present a large surface area to the wind, making them susceptible to being pushed off course by strong crosswinds. This lesson highlights the danger, especially on exposed sections of road like bridges and viaducts, and when overtaking other large vehicles. It advises drivers to reduce speed and maintain a firm grip on the steering wheel when experiencing strong gusts.
A tyre blowout or engine failure can be a frightening experience. This lesson provides a clear action plan: maintain a firm grip on the steering wheel, avoid harsh braking, signal, and move the vehicle to a safe location like the hard shoulder if possible. It then covers the essential safety steps of activating hazard lights, placing the warning triangle, and waiting in a safe place away from the vehicle.
A breakdown can be a dangerous situation, especially on a busy road or motorway. This lesson provides a clear, sequential guide to follow. It includes pulling over to a safe location, activating hazard lights, placing the warning triangle, ensuring passenger safety, and contacting the appropriate services for assistance.

Driving in the Alps requires a high level of skill and vehicle sympathy. This lesson covers techniques for climbing steep gradients by selecting the correct gear to maintain momentum without straining the engine. It reiterates the critical importance of using low gears and auxiliary brakes for descending, to ensure the service brakes remain cool and effective for the entire descent.

This lesson focuses on general driving safety in areas with a high concentration of children. It stresses the importance of significantly reducing speed, being prepared for unexpected events, and scanning for children between parked cars. The driver must exhibit maximum vigilance in these high-risk environments at all times.
Find clear answers to common questions learners have about Procedures for Securing the Vehicle at an Incident Scene. Learn how the lesson is structured, which driving theory objectives it supports, and how it fits into the overall learning path of units and curriculum progression in Switzerland. These explanations help you understand key concepts, lesson flow, and exam focused study goals.
On motorways, you must place your warning triangle at least 100 meters behind your vehicle. This provides sufficient warning to approaching high-speed traffic, allowing them to adjust their speed and lane position safely.
Yes, for safety and compliance reasons, you should always ensure you are highly visible. Putting on your high-visibility clothing before exiting the cab is the correct procedure to ensure other road users see you clearly as you move to secure the scene.
Your first priority is to make the scene safe. This involves switching on your hazard warning lights immediately to alert other road users, and then assessing the situation from a safe position before exiting the vehicle.
Yes, while 100 meters is standard for high-speed motorway traffic, you must adapt your positioning on narrower or slower roads to ensure the warning is visible in time, adhering to general Swiss road safety principles.
Pinpoint specific Swiss traffic rules, road signs, or driving situations you need to master. Use the practice search to start a focused revision session now and build confidence for your official driving theory exam.